
I found this picture a while ago on Google and I posted about it a while ago but I never got around to doing a tutorial. :'( This one is more of a how-to rather than a picture one, but nonetheless, I hope you enjoy! Some things are pretty self explanatory on how to do, like the twine being wrapped, so these are just some tips and suggestions.
This post became very popular on my Pinterest (I pinned it because I wanted to re-create it but I didn't know so many people were interested! :l) so I decided it was time I actually put up the "tutorial."
The original post: http://www.pinterest.com/pin/487162884665049981/
My Pinterest: (follow :)) http://www.pinterest.com/crafterlife/
How to create miniature packages:
All you need is some old thick orange-yellow envelopes that you can cut up for the wrapping and any material you can shape into cubes or rectangular prisms, like:
-Styrofoam (if you're styrofoam is too thin, you can cut up small rectangular pieces that are the same size and stack them on top of eachother - you'll be wrapping them in envelope paper so it doesn't have to be perfect! :))
-Clay
-Foam (you can use the same layering technique as mentioned with Styrofoam if it's too thin)
-You can be creative! :) Pretty much anything that can be in a rectangular prism shape works. Make different sized packages (tall, big, small, flat, etc.) for a more realistic touch :) You might even use a variety of materials to get the different sizes :)
How to create miniature postcards:
Other materials:
-Twine (to wrap around the packages)
-Stamps - small (optional) to put on the packaging
I hope you enjoyed this quick how-to I put together for this image I found, and I hope you'll subscribe and follow me on Pinterest! Please comment if you have any questions, or if you want to tell me what you want to see in my next post!
Comment what your favourite Crafter's Home entry is and you could be featured in a future blog entry! :)
Follow me on Pinterest:
http://www.pinterest.com/crafterlife/
Subscribe for all the latest Crafter's Home updates :) You'll find the signup on the right :)
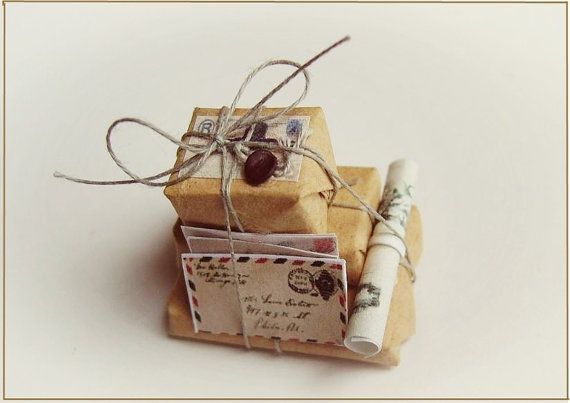
This post became very popular on my Pinterest (I pinned it because I wanted to re-create it but I didn't know so many people were interested! :l) so I decided it was time I actually put up the "tutorial."
The original post: http://www.pinterest.com/pin/487162884665049981/
My Pinterest: (follow :)) http://www.pinterest.com/crafterlife/
How to create miniature packages:
All you need is some old thick orange-yellow envelopes that you can cut up for the wrapping and any material you can shape into cubes or rectangular prisms, like:
-Styrofoam (if you're styrofoam is too thin, you can cut up small rectangular pieces that are the same size and stack them on top of eachother - you'll be wrapping them in envelope paper so it doesn't have to be perfect! :))
-Clay
-Foam (you can use the same layering technique as mentioned with Styrofoam if it's too thin)
-You can be creative! :) Pretty much anything that can be in a rectangular prism shape works. Make different sized packages (tall, big, small, flat, etc.) for a more realistic touch :) You might even use a variety of materials to get the different sizes :)
How to create miniature postcards:
- Find postcards (a mixture of the front with the picture and stamp, and the backs with the writing) images on Google.
- Copy and paste them into a Word document.
- Miniaturize them by resizing the images and print them out. :) You can put them on cardstock to make them more sturdy and resemble real postcards. (Note: you should still be able to tell that they are postcards when they are small. It might not be as clear but details like a stamp or the small writing should still make it clear that it is a postcard. When you look at the picture of the original mail packages, despite its small size, you can still tell that it is a postcard/letter mail. So you should choose images that can be distinguished as a mail)
Other materials:
-Twine (to wrap around the packages)
-Stamps - small (optional) to put on the packaging
I hope you enjoyed this quick how-to I put together for this image I found, and I hope you'll subscribe and follow me on Pinterest! Please comment if you have any questions, or if you want to tell me what you want to see in my next post!
Comment what your favourite Crafter's Home entry is and you could be featured in a future blog entry! :)
Follow me on Pinterest:
http://www.pinterest.com/crafterlife/
Subscribe for all the latest Crafter's Home updates :) You'll find the signup on the right :)
 RSS Feed
